Monday, December 30, 2013

DI Workshop: Grassroot Engineering

Co-instructor
- Transferjet engineer, Consultant - rural technology, semiconductor and solar energy.

Workshop Tentative Schedule

Day - 1: Project management, documentation (blogging)
Day - 2: Technical Sessions
            - CAD/ 3D Printing
            - Make your own Microcontroller Kit
            - Android session and  Transferjet (TOSHIBA)
            - Input/Output Devices (??)
            - Image Processing, Signal processing
            - MATLAB (??)(general, GUI, Image processing, Data acquisition - Analog,Digital I/O)

Day - 3: Field trip
- Field trip briefing:
- Observation
- Need statements
- Filtering need statement
- Ideation of solutions
- Filtring one solution
- Making Prototype
- Documentation and Presentation

Day -4:
- 30s pitch (Students presentation)
- Start presentation with GIRAFFE (a word)
      - ask audiance/students for feedback.
      - Give feedback on presentation (individual).
      - Start with positive hook.
      - talk about custumer experiance. (tecnology flaw into plus point)

Resources required for ~50 students


Total Cost ~ $2200
 - Field visit suggestions
- Curriculum
-

Define problem first
Which techonoloyg to use

Topics - Education, healthcare, transportation, banking, finance, agriculture (villagers willing to pay), Information and energy.

Toshiba community space (social orientation). Where bussiness and enterprenures can use the technology created and make money. Replicate such community space to other places.

- Villagers wants to provide information to outer world.
- Internet at village (FabFi?)

- Village - Ratnagiri
- NGO started a different kind of school which teaches skills to solver local problems
- They (teachers) are developing prototype with LEDs. Desk (like laptop) with LEDs.
- Working today based on future projection.

- Near field communication device

////


Monday, December 23, 2013

Innovation and Entepreneruship Workshop

Sunday 22nd, 2013


- Report on field trip from Yesterday.
- Session on IOIOIO Board by Dan.

01/07/13

Entrepreneurship - Identifying the opportuniy other don't see, taking risk, build with whatever you have
MBA is a manager.
- Train kids

Round - 2

Step - 1: Field Trip Observation
Step - 2: Identify couple of problems
Step - 3: Analyze each problems (why it exist, how much impact, finicial gain, stack holder - who will benefit and who will suffer) and narrow down to one problem.
Step - 4: Potential solutions.
Step - 5: Finalize one solution and conceptualize it.
Step - 6: Make a prototype.


Round - 3

Seed ideas for project. Don't spend much time on finding problem in round-3.
Business analysis.
- Experience of working with people. Technical skill in blog.
- Call students and ask to present.
-
Give them 20 need statement.
Technical entrepreneurship.


Pre-Workshop

Kits
- Bluetooth 

Tutorial Sessions
- PCB prototyping
- Make your own uC Board/Arduino
- Arduino
- Sensors
- Android
- Matlab (general, image processing, interface with android, interface with arduino)

Sunday, December 22, 2013

TBN Atmega32U4 Board

Features

Parts Required

1 - Atmega32U4 (Digikey Part# ATMEGA32U4-AURCT-ND)
Note -  Atmega32U4-AUR is shipped with Low Power Crystal Oscillator (8.0MHz-16MHz) enabled and Atmega32U4RC-AUR is shipped with Calibrated Internal RC oscillator (8.0MHz) enabled. Since we are using external crystal, we will use Atmega32U4-AUR.
2 - Resistors
3 - Capacitors
4 - USB connector
5 - 3x2 Pin connector
6 - Push button
7 - Crystal 16MHz.
8 -  Ferrite Bead.

/spreadsheettttttttttt/


To Do in Next Version

1 - Change USB micro-B connector  (eagle part in ----)
2 - Add Potentiometer for ADC sample Code
3 - Add one pull button (for Arduino USB keyboard code, Arduino Mouse code, Digital Input code)
4 - Add horizontal/Vertical connector to access pins. 
5 -  Optional - Array resistor and RGB LED
6 -  Edit bootloader to add LED fadIn/Out when bootloader is running
7 - Sample code for ISP, Rx/Tx, Software Rx/Tx
8 - Hardware Rx/Tx pins

USB  connenctor used (eagle lib in sparkfun library)

https://www.sparkfun.com/products/8533


USB protection

http://www.st.com/web/en/resource/technical/document/datasheet/CD00001361.pdf

digikey part number - 497-2727-5-ND

Power jack

https://www.sparkfun.com/products/12748


Next Version Improvement

.

Friday, December 20, 2013

Arduino Hands-on Session

Check List

1) Aruduino Micro or Leonardo 
2) Jumper wires (male-male and male-female)
3) LCD
4) Keyboard
5) Buzzer
6) Ultrasonic Distance Finder
7) LDR or photodiode
8) GPS and GSM shield
9) DC motor and shield, stepper motor and shield and servo motor
10) 9V Rechargable battery + Charger, 5V voltage regulator kit
11) Fine tip soldering iron, low guage soldering wire, sponge, wire cutter, ribbion cable, breadboard flexible connection wire, sparkfun breadboard power supply stick
 

Installing Arduino IDE 

Note - If you have previous version of Arduino installed, first uninstall the previous version and delete all files/folder and shortcuts (in start, shortcut pined to taskbar, desktop shortcut etc) associated with Arduino.


1 - Copy "Arduino Workshop" folder to your local drive.
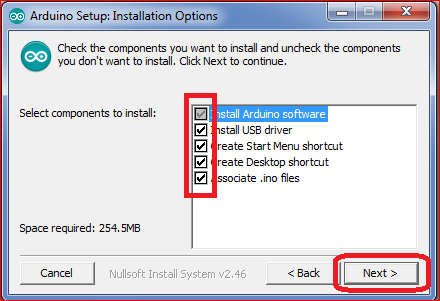
2 - Install Arduino with the setup file "arduino-1.0.5-windows" located inside this folder. ( optionally download setup file from here). Follow the instructions below to install Arduino IDE


Confirm the path of "Destination Folder" is "C:\Program Files\Arduino" or if you have 64bit OS it should be "C:\Program Files(x86)\Arduino". Click on Install.


Installation will proceed and following window will appear.


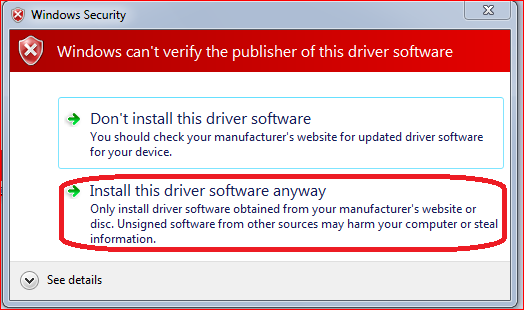
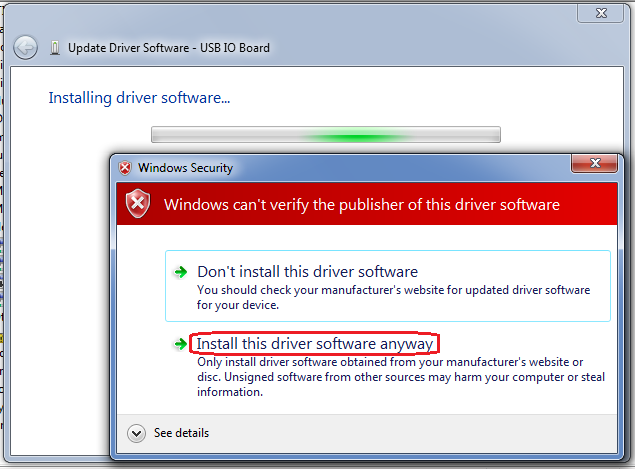
During installation, Windows will ask you to verify driver signature as shown below. Simply click on "Install this driver software anyway"


Once the installation is complete, you will see the following window. Simply click on "Close"


Installing Arduino Micro Driver.


1 - Open Device Manager windows (Start - Computer - Properties - Device Manager). Keep the window open.
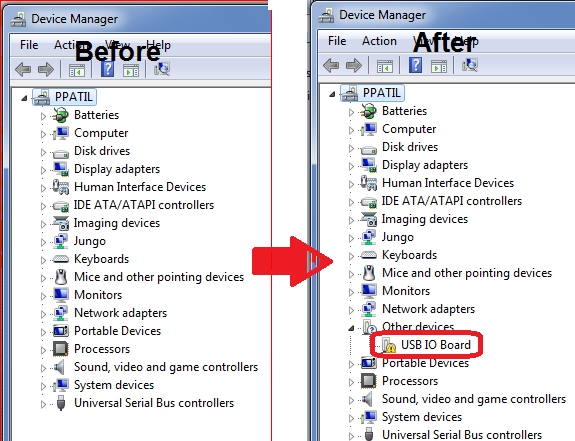
2 - Connect ArduinoMicro to your computer. The device manager list will refresh and a new device will appear . Also the windows will try to search for driver in  windows update. Click on "Skip obtaining driver software from Windows Update"


Also an "USB IO Board" will appear After you connect ArduinoMicro in Device manager as shown below -


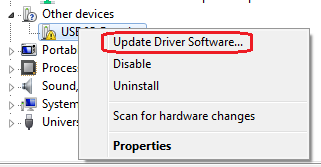
Right click on "USB IO Board" and click on "Update Driver Software ...."


Click on "Install this driver anyway".


After the drive is successfully installed, following window should appear. Go ahead and close 


You can verify if the driver is installed correctly, it should appear as "Arduino Micro" in device manager.


Programing Arduino Micro

1 - Run Arduino IDE from newly created shortcut during installation.
2 - Go to Tools - Board and select Arduino Micro

3 - Go to Tools - Serial Port and select the serial port associated with ArduinoMicro (in my case COM35). To check which serial port is associated with ArduinoMicro, go to device manager.


4 - Close Arduino IDE and Restart it again. You are ready to use arduino board.


Modules


LCD Interface

 - Use LUMEX 16x2 LCDs. They are compact but don't have back-light. For interfacing solder header to LCD and use jumper wires to make connection between LCD and arduino (can use arduino micro with sample code)
- Note, it is very important to connect PIN3 of LCD. If left open or connected to 5V, it will seems that LCD is off or not working at all. You can connect this pin to GND and text will appear. However, the contrast will not be very good. Ideal you should use a 10K potentiometer 


To Do:


1 - Put more delay in DigitalReadSerial and AnalogReadSerial code ~1000ms.
2 - Code for I2C networking, LCD display, keyboard


Order Links

1) Arduino Micro, Qt - 5


2) Breadboard power supply stick, Qt - 10


3) Wall adapter, Qt - 10


4) Barrel Jack Adapter, Qt - 12


5) 9V battery with charger, Qt - 2


6) Jumper Wire Kit M/M, Qt - 2


7) Jumper Wire Kit, M/F, Qt - 2


8) Jumper Wire Kit, F/F, Qt - 2


9) Male Header, Qt - 20


10) Female Header, Qt - 20


11) Solderable Breadboard, Qt - 10


12) Buzzer, Qt - 10


13) Stepper motor Drive, Qt - 2


14) DC motor driver, Qt - 2


15) Plastic Box, Qt - 10


Thursday, December 19, 2013

Finding Electronics Parts

Digi-Key

www.digikey.com

Dealextreme.com
www.dx.com
(ex - SD card module ~3$ )

Jameco

www.jameco.com

Fry’s

www.outpost.com (doesn’t
list all items in store)

Allied

www.alliedelec.com

Newark

www.newark.com

Radio Shack

www.radioshack.com

Hosfelt

www.hosfelt.com

Tuesday, December 10, 2013

Persnal Mobile Lab (draft)

I like to have fun on the go. Here is my personal mobile lab which I carry with me everywhere I go.

Test and Measurement Tools


1) FLUKE-179/EDA2 Multimeter
Digikey Part# 614-1-23-ND


2) Oscilloscope: Tekscope THS720 (I bought it for cheap at ebay)
Its both an oscilloscope and an digital multimeter. You don't need an extra multimeter if you have this one.

3) Logic analyzer - Logic16
I bought PC based logic analyzer for $200 from here
Unless you really need it don't buy it.

4) Soldering Iron

I mostly work with SMD component and hence use fine tip soldering irons.  Some options are

- 120V soldering iron station (WES51-120V-ND) $127
- 240V soldering iron station (WESD51D-240V-ND) $190
- (a) 230V soldering iron (T0056403799-ND) $57

(b) Soldering Iron stand ans sponge (PH60-ND) $16

 - Tweezers  (EROP7SA-ND), $3.7


another cheap option is to buy soldering iron locally and custom fit the fine tip.


Electronics Part


1)  Resistors, Capacitors and Inductors


I bough bookstyle kit for resistors, capacitors and inductors kit for ~$60 each. It has almost all the components you may need. I liked the bookstyle packaging as its very portable.

Some Kits


Its good idea to keep kits like Arduino with you as you might not get change to make PCB on go.


Sunday, December 8, 2013

Programming using AVR Studio

1) Install AVR studio 6 ( http://www.atmel.com/microsite/atmel_studio6/ ).
2) For programming, I am using AVRISPmkII ( http://store.atmel.com/PartDetail.aspx?q=p:10500054 ). Make sure to power your board from external power supply (USB port etc.). Connect AVRISPmkII to your computer, go to device manager and verify that it is being recognized by windows. AVR studio uses "jango" driver which is not compatible with Arduino IDE.


Steps

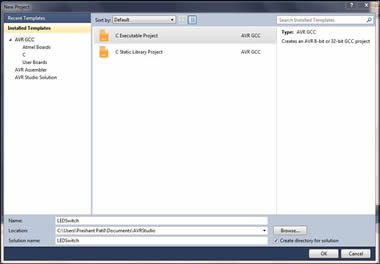
1) Go To File -> New -> C Executable Project (Write name of your project, browse for location). Click OK.


2) In the Device Selection window select your microcontroller. (In my case it is Attiny44A)

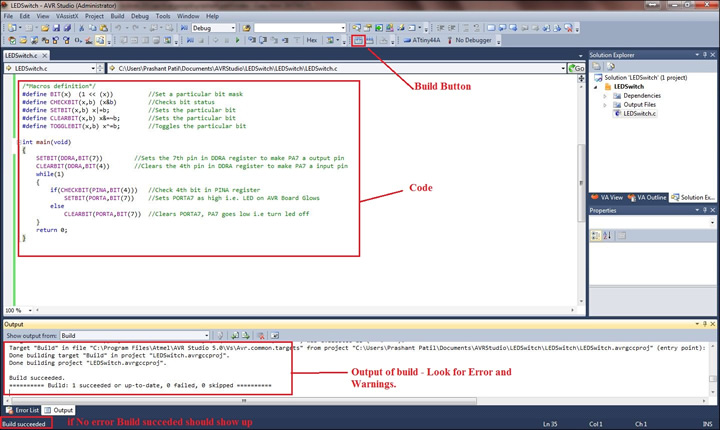
3) AVR studio will open up a .c file with some initial code. You can write you code in this file. Once finished writing the code, Go to Build - > Build or simple click the Build button shown below.


4) The program will compile your code and if no error you should se Build:1 succeded at the Output window as shown above. A .hex file will be created in the project directory which we have to upload to the micro-controller.

Different combination of above building blocks can be used to build the unit cells of all the crystal structures. Here, I have shown few examples -

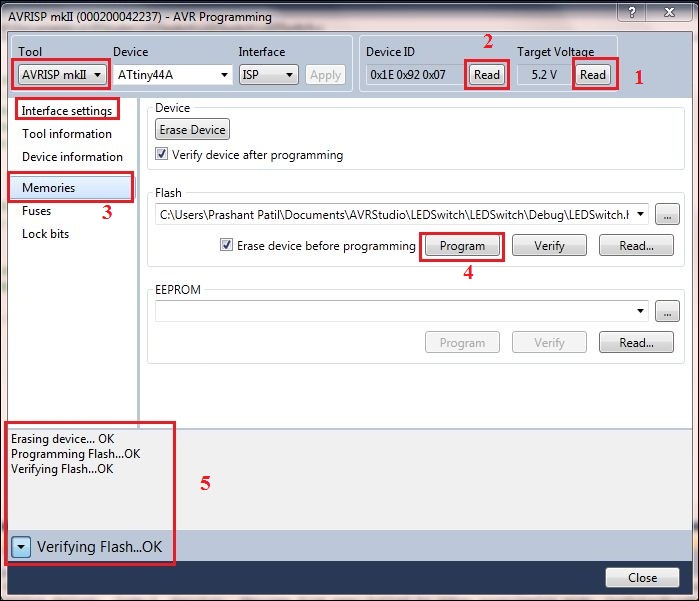
Step 5: Programing the board - Connect the ISP pin of AVRISPmkII to your board (make sure you connect in right polarity). Go to Tools -> AVR programming. In the "Tool" drop-down list select your programmer (I used AVRISP mkII), In Device select your uC ( I used ATtiny44A). Click on "Read" button below Target Voltage, the reading should be the voltage you are supplying to your board (Use external power supply to power your board, AVRISP mkII do not power the board unlike FabISP). Similarly click on "Read" button below Device ID and your device ID should appear provided all the connections are correct.
Debugging - If something goes wrong, check your connections and try varrying ISP clock speed in the "Interface Settings" Tab.

Step 5: For programing go to "Memories" Tab, browse to the projectfolder/Debug and locate the filename.hex file, then click on "Program" button. If programmed The message at the botton should read like " Programming Flash OK" as shown below.


Step 6: Immidiately after the programing finished, the board will start executing the code and we can use the board.