Check List
1) Aruduino Micro or Leonardo
2) Jumper wires (male-male and male-female)
3) LCD
4) Keyboard
5) Buzzer
6) Ultrasonic Distance Finder
7) LDR or photodiode
8) GPS and GSM shield
9) DC motor and shield, stepper motor and shield and servo motor
10) 9V Rechargable battery + Charger, 5V voltage regulator kit
11) Fine tip soldering iron, low guage soldering wire, sponge, wire cutter, ribbion cable, breadboard flexible connection wire, sparkfun breadboard power supply stick
10) 9V Rechargable battery + Charger, 5V voltage regulator kit
11) Fine tip soldering iron, low guage soldering wire, sponge, wire cutter, ribbion cable, breadboard flexible connection wire, sparkfun breadboard power supply stick
Installing Arduino IDE
Note - If you have previous version of Arduino installed, first uninstall the previous version and delete all files/folder and shortcuts (in start, shortcut pined to taskbar, desktop shortcut etc) associated with Arduino.1 - Copy "Arduino Workshop" folder to your local drive.
2 - Install Arduino with the setup file "arduino-1.0.5-windows" located inside this folder. ( optionally download setup file from here). Follow the instructions below to install Arduino IDE

Confirm the path of "Destination Folder" is "C:\Program Files\Arduino" or if you have 64bit OS it should be "C:\Program Files(x86)\Arduino". Click on Install.

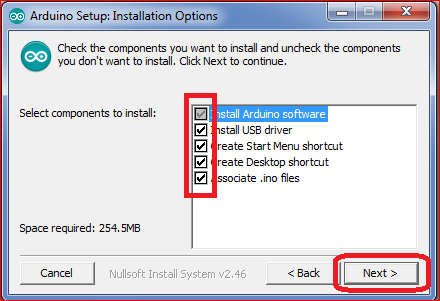
Installation will proceed and following window will appear.

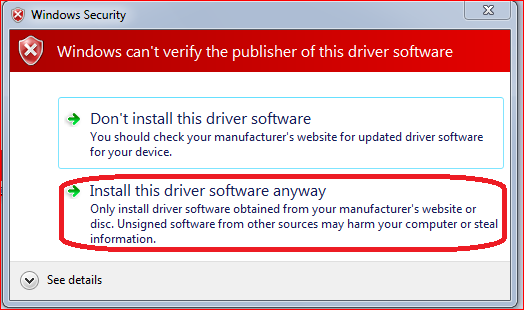
During installation, Windows will ask you to verify driver signature as shown below. Simply click on "Install this driver software anyway"
Once the installation is complete, you will see the following window. Simply click on "Close"

Installing Arduino Micro Driver.
1 - Open Device Manager windows (Start - Computer - Properties - Device Manager). Keep the window open.
2 - Connect ArduinoMicro to your computer. The device manager list will refresh and a new device will appear . Also the windows will try to search for driver in windows update. Click on "Skip obtaining driver software from Windows Update"


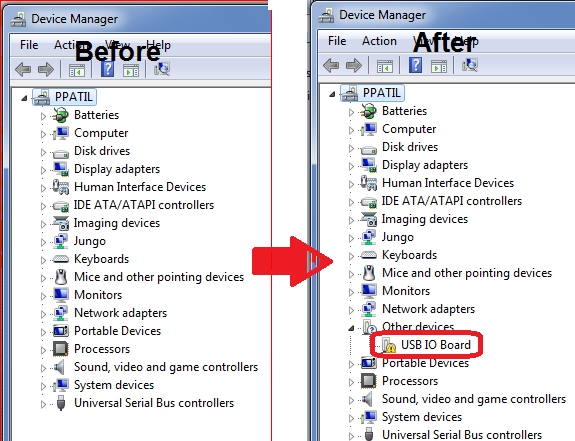
Right click on "USB IO Board" and click on "Update Driver Software ...."


Click on "Install this driver anyway".

After the drive is successfully installed, following window should appear. Go ahead and close

You can verify if the driver is installed correctly, it should appear as "Arduino Micro" in device manager.

Programing Arduino Micro
1 - Run Arduino IDE from newly created shortcut during installation.
2 - Go to Tools - Board and select Arduino Micro

3 - Go to Tools - Serial Port and select the serial port associated with ArduinoMicro (in my case COM35). To check which serial port is associated with ArduinoMicro, go to device manager.

4 - Close Arduino IDE and Restart it again. You are ready to use arduino board.
Modules
LCD Interface
- Use LUMEX 16x2 LCDs. They are compact but don't have back-light. For interfacing solder header to LCD and use jumper wires to make connection between LCD and arduino (can use arduino micro with sample code)- Note, it is very important to connect PIN3 of LCD. If left open or connected to 5V, it will seems that LCD is off or not working at all. You can connect this pin to GND and text will appear. However, the contrast will not be very good. Ideal you should use a 10K potentiometer
To Do:
1 - Put more delay in DigitalReadSerial and AnalogReadSerial code ~1000ms.
2 - Code for I2C networking, LCD display, keyboard
Order Links
1) Arduino Micro, Qt - 5
2) Breadboard power supply stick, Qt - 10
3) Wall adapter, Qt - 10
4) Barrel Jack Adapter, Qt - 12
5) 9V battery with charger, Qt - 2
6) Jumper Wire Kit M/M, Qt - 2
7) Jumper Wire Kit, M/F, Qt - 2
8) Jumper Wire Kit, F/F, Qt - 2
9) Male Header, Qt - 20
10) Female Header, Qt - 20
11) Solderable Breadboard, Qt - 10
12) Buzzer, Qt - 10
13) Stepper motor Drive, Qt - 2
14) DC motor driver, Qt - 2
15) Plastic Box, Qt - 10
No comments:
Post a Comment